Pages

Showing posts with label birthday parties. Show all posts

Thursday, August 11, 2011

23 days and counting....

Until the LSU football season, that is. If you are like most from around these parts, you knew that already.

Here is a cake we recently did for a young boy.


The football is made out of rice cereal treats and covered in fondant. We also gave our cricut a good workout with this cake. It cut the tiger stripes, tiger eyes and the lettering.
Hope you had a great birthday Ryan!


Thursday, June 23, 2011

Eli Eli O

Last month, Eli turned two! Where has the time gone? We celebrated his birthday with a "farm" themed party. His first babysitter would always sing Eli Eli O to him and that, of course, got us thinking... what a cute idea for a party!

I ordered the invitation here.  She has a lot of adorable things and was able to customize the invitation to read Eli Eli O instead of the normal E I E I O.

For the back drop, we refinished a room divider screen by painting it black and cutting and sewing cow print fabric for the panels.


The cake was designed completely from the invitation. The barn is hard to see but it is a fondant mock up of the barn on the invite. 


K's signature cookies that matched the theme perfectly!


Next up... stick horses! To me, this was the cutest and most fun thing to put together. We made 17 stick horses as favors for our little guests. All of the horses came from scrap fabric that I have been saving over the years. We loved watching them come to life and seeing their different personalities. We may or may not have been a little sad to watch them leave the party!  


The birthday banner was made by cutting burlap squares. I used the cricut to cut out my letter templates and then painted on the letters to each square. I love the way it turned out!


 For the menu we had corn dogs, BBQ pulled pork sandwiches, veggie cups, chips and of course corn on the cob.  The birthday boy really enjoyed the corn!


Here he is with his stallion. 


The kids enjoying the stick horses. 


Happy Birthday Eli! We love you more than you'll ever know!


Monday, May 30, 2011

Chunky Monkey

When a friend at work asked me to bake for her son's first birthday I was honored.  A first birthday?  Wow, this is a memento occasion!  Sure I said, what's the theme?  Well she had to think on that and came back a few days later with a "monkey" theme.  She said that they call him "chunky monkey" so that would be fitting.  Then she supplied me with pictures she had downloaded.  A cake, smash cake and cupcake toppers.  I thought, "oh boy, this is a big order to fill".  Not to mention the cookies I had always promised her I would donate for his first birthday.  The cake - a ten inch round with a gum  paste monkey on top surrounded by many, many gum paste bananas.  The smash cake - a banana shaped cake,  and the cupcake toppers - twenty-four little fondant monkey faces.  What did I get myself into?  Well I did say yes, so buckle down and get busy.  My first task was to create a fondant monkey for the cake topper.  To test my skills I first made one from modeling clay.  I loved the outcome so then I proceeded to duplicate him in fondant.  Again, I was pleased with the little monkey and decided I was done with that task. 

 Next, bake cookies and decide what cookie cutter to use.  I have a monkey face but decided not to use it. Instead I opted for a circle cutter.  Flood the cookies in green and add yellow polka dots (since these were two of the colors chosen for the party theme).  Next, make monkey faces to go on top using the royal icing transfer method.  I really loved the look of these. 


Now the biggie .... The Cake.  Really this was the easy part.  Once I had it baked and leveled.  To apply the icing and get it really smooth did not take as long as anticipated. 
Then on to the gum paste bananas.  This too was a really quick task.  I just had to make very many of them to get the look I was going for.  Once complete it was time to put it all together.


Then on to the smash cake.  I took a ten inch round cake and cut the shape of a banana from it. Covered it in chocolate butter cream icing.  Rolled out my yellow fondant and applied it to the banana shaped cake.  This worked well and made a clean banana shaped cake.

Smash Cake

Last, the monkey face cupcake toppers.  These were made of fondant dyed in two shades of brown.  Then using an edible food marker I drew the eyes and mouths.  Again, not difficult just time consuming.

Whew ... job complete!  But I hear Drew had a wonderful 1st birthday and that he really enjoyed his smash cake.  He ate the entire "banana" cake.  That makes it all so well worth the work!

Tuesday, January 25, 2011

A first for us...

... and the reason for our absence here! This past Saturday we put together a party for a sweet (or should I say "tweet") little one year old. It was our first time doing it for someone other than family. We planned and created for about a month, so to see it all come together was a really great feeling!

So without further ado, lets get on to the pictures!
Here is the table completely set up. The mother of the birthday girl came up with the theme, "little love bird", and the colors that she wanted to use and we ran with it.


I think my absolute favorite thing from the party were these yarn pom pom arrangements. I'm pretty sure the momma bird liked them also since she kept them to put up in the baby birds room!

They were super easy to make and we just glued the pom pom to the end of a branch.


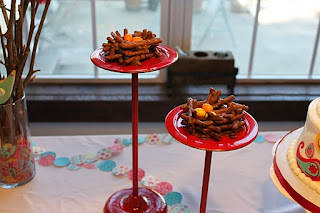
What birdie themed birthday party would be complete without a few nests? We made these from pretzels dipped in chocolate candy melts. It took us a little while to perfect our nest building skills but in the end we were becoming old pros! 

Also, these mini cake stands are awesome! They actually have a glass dome to go on top of them. We found them on sale at Hobby Lobby (love that place!) after Christmas! We couldn't help but snatch them up. They were the perfect addition to the table!  


These were two of the three "snack" foods we made besides the cake and smash cake. I've wanted to make these popcorn cones since the first time I saw them on another blog. K was able to recreate them perfectly! We filled them with caramel popcorn and named it birdie munch. Next to the popcorn sat the marshmallow clouds. These are super easy! Marshmallows dipped in candy melts and we alternated dipping some in sanding sugar and some in white nonpareils.


This was the birthday girl's smash cake! I loved the way it turned out! It's so simple and matched the theme perfectly!
This was the cake design we had came up with. Another paisley cake with a few flowers added in.
Cake decorating is fun but it can also be stressful! We fought with the icing on this cake for what seemed like eternity!!! K was able to get it presentable and with the decorations the flaws were less noticeable. Still, it's just one of those things that bug you when you know it isn't your best work.


K made her AMAZING cookies which you had a sneak peak earlier this month. They went perfectly with the theme and the colors just popped!


I like this little fella just perched on his nest!


 The next project was one that we both loved. When we saw how it all came together, we decided we each needed one for our dining room table!

I had the mother of the birthday girl email me her favorite pictures from the past year. I converted them all to the sepia tone so they wouldn't clash with the scrap booking paper we wanted to incorporate. We backed them on the paper and then tied them using our trusty yarn!


And again with the yarn! We saved all of our clippings from "fluffing" the pom poms and reused them to add some color to the bottom of the vase. 


And what party would be complete without party hats for the guests?


Lastly, we made labels for the water bottles. This is so easy and adds so much personalization and color to your party! The birthday girl's mother came up with using the different drink mix ins in the colors for the party! What a great idea and it really made those labels pop!


So after all was said and done... I *think* we pulled it off. The birthday girl's mom has such an awesome sense of style that we were worried about getting it just right but she loved it! So, mission accomplished!

Thanks for looking!


Tuesday, November 16, 2010

Lucy's Princess Party

I cringed at Lucy's answer when I asked her what type of party she wanted for her 5th birthday. Princess... I tried to talk her out of it but in the end it was what she truly wanted. I'm not sure why the princess party didn't appeal to me... maybe because it's over used, maybe because I wanted to plan something more unique. In the end though, the one that matters is the birthday girl. So princess it was!

I knew that I wasn't going to go with the Disney Princess theme because she isn't into it all that much. I asked her what colors she wanted her party to be and we went from there.

Our goal in planning this party was to make Lucy and a few of her close little friends feel like a real princess that morning and for all of the mommas to be able to visit and enjoy good conversation over warm cups of coffee. Mission accomplished I believe! The party was from 10 am to noon and at 1 pm some of our guests where just beginning to leave.

So I'll get on with the pictures already!


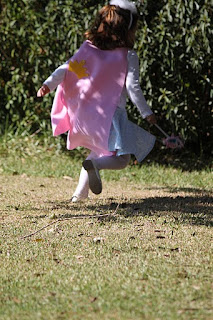
I made Lucy's skirt after seeing the tutorial on this awesome website. I brought the scrap fabric to a local friend that monograms and this is the shirt that she came up with.
K made the wand she is holding... plus about 9 more of them! Aren't they adorable?


She also made the ribbon topiary. I'm not sure what site we found those on but I'm sure a quick google search would return many hits. They were simple but time consuming. I'm anxious to make some Christmas ones for my dining room table.


We had place settings for each little princess that included their tea cup, plate, bracelet, a huge diamond ring that doubled as a napkin ring and a cape (more on those later!).


At the beginning of the planning I picked out scrap booking paper in the colors that Lucy had specified. I went with that as a base for all of the decorations. I loved the way her banner came out. In fact, I must really love it because it's still hanging in my dining room right now, ha!

Pom Poms! What is not to love about these? They are so simple and inexpensive to make. They just make the room seem so much more festive!

Moving on now to the dessert table!

I wanted her cake to be spectacular. She sees the other cakes we do and so I didn't want hers to pale in comparison to any of those. We made her a chocolate, strawberry and vanilla cake. We used the cricut to cut the crown and her name. I'm pleased with the simplicity of this cake and loved the daintiness that the edible sugar pearls added.
K made the cookies and they were adorable and delicious! We made the marshmallow pops to add some color to the table but they ended up being a favorite among the children. Easily accessible and everything is more fun if it's a pop!

The garland in the picture above was so simple to make and added more color to the desert table. We used scrap booking paper and punched 1 1/2" circles. Then all you do is set your sewing machine to a basting stitch and slide one circle in after the other! YES! You can sew paper! I think I'll make some for every season!

Next I'd like to show you the capes I referred to earlier. These were the easiest little things to make and I think the girls loved them. My mother-in-law had a pattern for a boy's super hero cape that she modified slightly for our princess capes. We used felt as it would be the easiest route for making ten of them (no hemming or turning under needed to prevent fraying). We used a gold bias tape for the tie and that proved to be the simplest way to go. I hand cut the crowns and K used Heat n' Bond to adhere them to the capes. She came back and appliqued jewels to the points to give them a little added "bling". I loved the way they came out!


I believe that is it! We had such a fun time planning and preparing for this party. Lucy and the girls had a great time and us mommas did too!

Thanks for looking!

KandA

Thursday, October 7, 2010

Someone is turning FIVE!

And the planning for a perfect princess party is in the air! These will be Lucy's invitations. I had a friend help me with designing them and I love the way they came out!
I'm so excited to watch everything start coming together! We will have a busy weekend of baking and sewing this weekend getting ready!
Wish us much productivity!

The A of KandA